Blog

  • Explore Blazor render modes and component lifecycle

    Blazor is a .NET frontend web framework that supports both server-side rendering and client interactivity in a single programming model:

    • Create rich interactive UIs using C#.
    • Share server-side and client-side app logic written in .NET.
    • Render the UI as HTML and CSS for wide browser support, including mobile browsers.
    • Build hybrid desktop and mobile apps with .NET and Blazor.

    quote

    Components

    Blazor apps are based on components. A component in Blazor is an element of UI, such as a page, dialog, or data entry form. Components are .NET C# classes built into .NET assemblies that:

    • Define flexible UI rendering logic.
    • Handle user events.
    • Can be nested and reused.
    • Can be shared and distributed as Razor class libraries or NuGet packages.

    The component class is written in the form of a Razor markup page with a .razor file extension. Components in Blazor are formally referred to as Razor components, informally as Blazor components. Razor is a syntax for combining HTML markup with C# code.

    school management

    Static and interactive rendering concepts

    Razor components are either statically rendered or interactively rendered:

    • Static or static rendering is a server-side scenario where the component is rendered without interplay between the user and .NET/C# code. JavaScript and HTML DOM events remain unaffected, but no user events on the client can be processed with .NET running on the server.
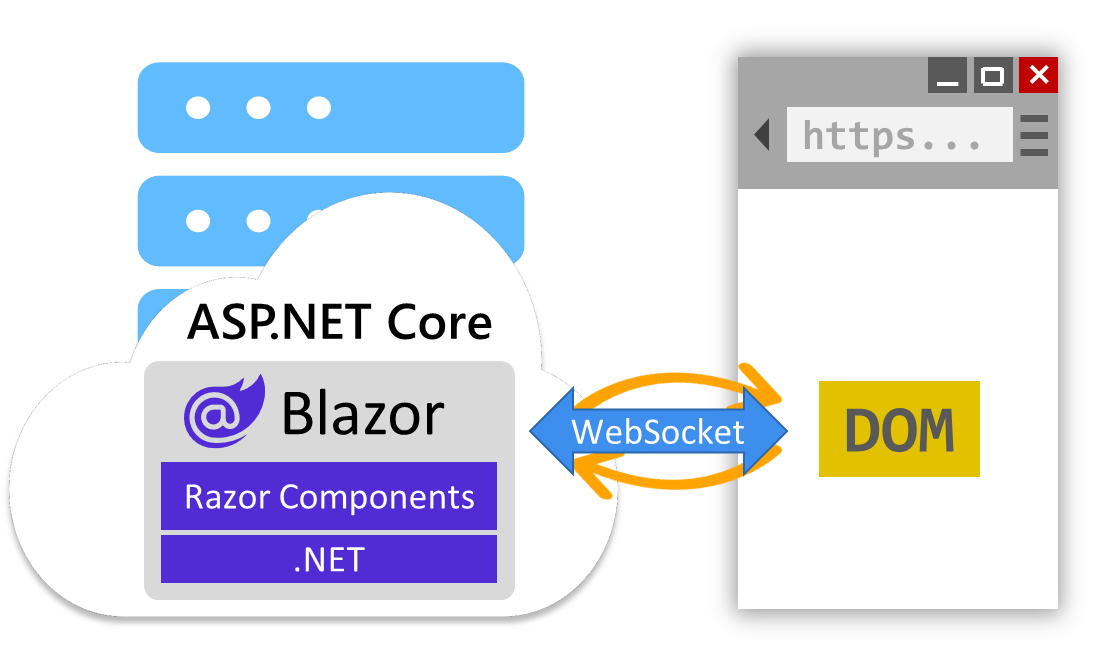
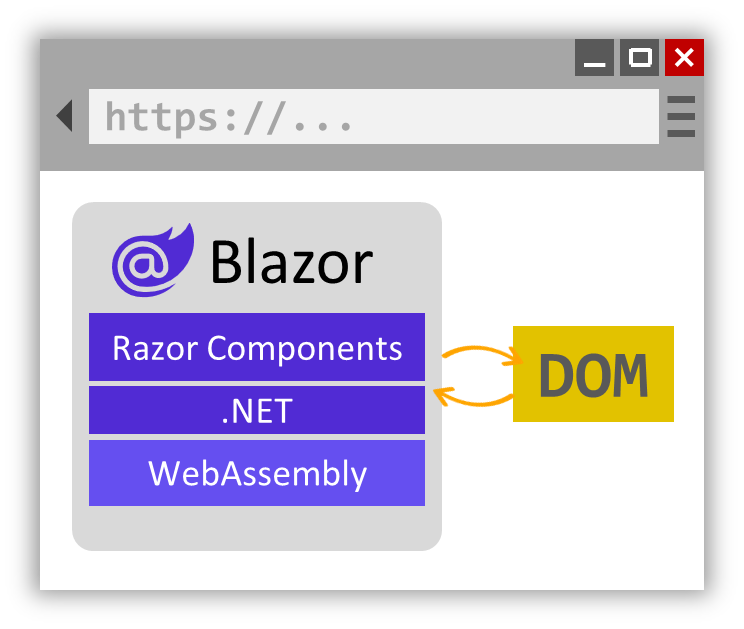
    • Interactive or interactive rendering means that the component has the capacity to process .NET events via C# code. The .NET events are processed on the server in the ASP.NET Core runtime, or in the browser on the client in the WebAssembly-based Blazor runtime.

    software development

    Client and server rendering concepts

    Activity that takes place on the user’s system is said to occur on the client or client-side. Activity that takes place on a server is said to occur on the server or server-side. The term rendering means to produce the HTML markup that browsers display.

    • Client-side rendering (CSR) means that the final HTML markup is generated by the .NET WebAssembly runtime on the client. No HTML for the app’s client-generated UI is sent from a server to the client for this type of rendering. User interactivity with the page is assumed.
    • Server-side rendering (SSR) means that the final HTML markup is generated by the ASP.NET Core runtime on the server. The HTML is sent to the client over a network for display by the client’s browser. No HTML for the app’s server-generated UI is created in the client for this type of rendering. SSR can be of two varieties:
      • Static SSR: The server produces static HTML that doesn’t provide for us interactivity or maintaining Razor component state.
      • Interactive SSR: Blazor events permit user interactivity and the Blazor framework maintains the component state.
    • Prerendering is the process of initially rendering page content on the server without enabling event handlers for rendered controls. The server outputs the HTML UI of the page as soon as possible in response to the initial request, which makes the app feel more responsive to users.

    staff augmentation service

    Render modes

    Every component in a Blazor Web App adopts a render mode to determine the hosting model it uses, where it’s rendered, and if it’s interactive.

    The following table shows the available render modes for rendering Razor components in a Blazor Web App.

    NameDescriptionRender locationInteractive
    Static ServerStatic server-side rendering (static SSR)ServerNo
    Interactive WebAssemblyClient-side rendering (CSR) using Blazor WebAssembly.ClientYes
    Interactive AutoInteractive SSR using Blazor Server initially and then CSR on subsequent visits after the Blazor bundle is downloaded.Server, then clientYes
    Interactive ServerInteractive server-side rendering (interactive SSR) using Blazor Server.ServerYes

    Enable support for interactive render modes

    A Blazor Web App must be configured to support interactive render modes. The following extensions are automatically applied to apps created from the Blazor Web App project template during app creation. Individual components are still required to declare their render mode, per the previous Render modes section, after the component services and endpoints are configured in the app’s Program file.

    Services for Razor components are added by calling AddRazorComponents. The following Program file example adds services and configuration for enabling interactive SSR:

    C#

    builder.Services.AddRazorComponents()
        .AddInteractiveServerComponents();
    

    Apply a render mode to a component instance

    To apply a render mode to a component instance use the @rendermode Razor directive attribute where the component is used. In the following example, interactive server-side rendering (interactive SSR) is applied to the Dialog component instance:

    C#

    <Dialog @rendermode="InteractiveServer" />
    

    Lifecycle events

    The Blazor component lifecycle consists of several methods that allow developers to execute code at specific points during a component’s lifecycle. The lifecycle methods can be overridden to perform other operations in components during component initialization and rendering. Here are the key lifecycle methods:

    • OnInitialized / OnInitializedAsync: Called when the component is initialized. It’s a good place to perform any setup work for the component.
    • OnParametersSet / OnParametersSetAsync: Called each time the component’s parameters are set. This can happen after the component is first initialized or when the parent component re-renders and passes new parameters.
    • OnAfterRender / OnAfterRenderAsync: Called after the component finishes rendering. It’s a good place to perform any post-rendering logic, such as interacting with JavaScript.
    • ShouldRender: Called to determine whether the component should re-render. By default, it returns true, but you can override it to return false if you want to prevent the component from re-rendering.
    • Dispose / DisposeAsync: Called when the component is being disposed of. It’s a good place to release any resources that the component is holding onto.

    These lifecycle methods provide a structured way to manage the state and behavior of Blazor components throughout their lifecycle.

  • Introduction

    An API, or Application Programming Interface, is a set of rules and protocols that allows different software applications to communicate with each other. APIs provide a way for developers to access the functionality of another piece of software, such as a web service, and use that functionality in their own applications. APIs are used for many reasons, including:

    cyber security

    • Simplifying development: By using APIs, developers can access the functionality of other software without having to understand the details of how that software works. This can save time and effort when building new applications.
    • Enabling integration: APIs allow different software applications to work together, even if they weren’t originally designed to do so. This can help businesses integrate their systems and data, improving efficiency and productivity.

    data analytics

    Learning objectives

    After completing this module, you’ll be able to:

    • Describe the two types of APIs in ASP.NET Core.
    • Create Swagger documentation for an API by using Swashbuckle.
    • Interact with an API by using the Swagger interface.

    digital transformation

  • Summary

    Your team lead asked you to explore dependency injection in ASP.NET Core. You registered services using the Singleton service lifetime, and then investigated the differences between the Singleton, Scoped, and Transient service lifetimes.

    oracle siebel crm training courses malaysia

    Learn more

    • Dependency injection in ASP.NET Core
    • Dependency injection in .NET
    • Dependency injection guidelines

    oracle peoplesoft training courses malaysia

  • Allowing Negative Stock

    Negative Stock

    A negative stock occurs when you post a goods issue with a quantity that is larger than the book inventory. Negative stock balances may be required if, for organizational reasons, you enter goods issues before the corresponding goods receipts and the material is already physically located in the warehouse. Negative stocks always indicate that physical movements have to be entered in the system at a later stage. 

    To work with negative stock, you must allow it in Customizing and also for the material concerned.

    Negative stock is possible for the following stock types and special stocks.

    • Stock types:unrestricted use stock, blocked stock
    • Special stocks:Vendor consignment (K), Stock of material provided to vendor (O), Consignment stock with customer (W), Sales order stock (E), Project stock (Q), Returnable packaging with customer (V), Returnable transport packaging (M)

    If you work with negative stock balances, ensure that you do not have negative stocks on the balance sheet key date or when you carry out a physical inventory.

    microsoft 365 certification training courses malaysia

    Financial Postings for Goods Movements with Negative Stock

    For materials that are valuated with the standard price, there are no special features to note for negative stocks. However, for materials with a moving average price, it is possible that a price difference account may be posted to at goods receipt.

    mysql database training courses malaysia

    Analyses for Negative Stock

    If you have a negative stock of a material, the system shows it in the material master record in the accounting view, the plant stock view, and the storage location stock view. The negative stock also displays in the stock lists (GUI transactions and SAP Fiori apps).

    To determine which materials have negative stocks, for example, use the Display Warehouse Stocks of Material report. To do so, on the SAP Easy Access screen, choose LogisticsMaterials ManagementInventory ManagementEnvironmentStockWarehouse Stock (MB52). Or, on the Fiori launchpad choose the Display Warehouse Stock app.

    For example, you can execute the selection for several materials or for a storage location that allows negative stocks. For the system to display only the materials with negative stocks, select the Only display negative stocks checkbox on the selection screen.

    nodejs training courses malaysia

  • Summary

    Your team lead asked you to implement some features to your app using middleware. First, you implemented the built-in UrlRewriter middleware to redirect requests from /history to /about. Then, you created a custom middleware component that logs request details to the console. You also learned how to change the order of middleware components in the pipeline.

    blockchain training courses malaysia

    Learn more

    • ASP.NET Core Middleware
    • Write custom ASP.NET Core middleware

    azure training courses malaysia

  • Review the solution

    The following code is one possible solution for the challenge from the previous unit.

    jboss training courses malaysia

    C#

    Console.WriteLine("This is the first line.");
    
    Console.Write("This is ");
    Console.Write("the second ");
    Console.Write("line.");
    

    This code is just one possible solution, among many possible ways to achieve the same result. However, you should have used both the Console.WriteLine() and Console.Write(String) methods to produce the desired output.

    jboss enterprise application platform training courses malaysia

    Output

    This is the first line.
    This is the second line.
    

    If you were successful, congratulations! Continue to the next unit for a knowledge check.

     Important

    If you had trouble completing this challenge, review the previous units before you continue.

    oracle java training courses malaysia

  • Exercise – Make code changes

    Enhance your development workflow with the .NET CLI dotnet watch command. Unlike the dotnet run command, dotnet watch automatically rebuilds and re-runs your application whenever you make changes to the source files. Additionally, dotnet watch includes a hot reload feature, which injects updates directly to your running application without requiring a restart. dotnet watch allows you to see the results of your changes faster, boosting productivity, and efficiency.

    In this exercise, you will:

    • Run your web app created in the previous exercise, using the dotnet watch command.
    • View code change results while the web app is running.

    red hat linux administration training courses malaysia

    Run the web app with dotnet watch

    Run the web app using the dotnet watch command from the command line:

    In Visual Studio Code, if the integrated terminal pane isn’t already available, select New Terminal from the Terminal menu to open the integrated terminal.

    1. Build and Run the app with the following command:.NET CLIdotnet watch The project is built, run, and provides the ASP.NET Core app’s endpoint URL on the command line:OutputNow listening on: http://localhost:5287 Since the port number in the URL provided is set randomly in configuration at project creation, your endpoint may have a different port number.
    2. Open a browser to the URL generated at your own command line output, the app’s response Hello World! is displayed.

    red hat enterprise linux rhel training courses malaysia

    Change the app’s code and quickly view the results

    With the MyWebApp application still running and the browser still displaying the Hello World! response:

    1. Select the Program.cs in the Explorer pane of Visual Studio Code.
    2. Change the app.MapGet method so that it responds with "Hello .NET Developer Community!" instead of "Hello World!".
    3. Save the changes to your code.

    After saving the changes, dotnet watch will automatically detect the modification to the Program.cs file. It will then:

    • Hot Reload the Application: dotnet watch applies the changes to the running application without requiring a full rebuild when possible.
    • Rebuild the Application (if necessary): If the changes can’t be hot reloaded, dotnet watch automatically rebuilds the application to incorporate the changes you made.
    • Restart the Application (if necessary): If a full rebuild is required, dotnet watch restarts the application.

    The output in the terminal indicates that the file Program.cs changed and the changes were hot reloaded into the running app.

    To see the result of the change, refresh your browser. The updated response “Hello .NET Community!” is displayed.

    This automatic rebuild and restart process allows you to quickly see the results of your changes without manually stopping and restarting the application.

    red hat certified specialist in server hardening malaysia

  • When to use ASP.NET Core

    ASP.NET Core is a cross-platform, high-performance framework for building modern web applications. Whether ASP.NET Core is the right web development framework for you depends on many factors.

    iot internet of things training courses malaysia

    When to use ASP.NET Core

    ASP.NET Core for web development is ideal when your web app has any of these requirements:

    • Rich user interfaces: You want to build interactive and dynamic web applications. With support for Blazor and popular front-end JavaScript frameworks, ASP.NET Core allows you to create rich user interfaces.
    • API development: You need to develop robust API services. ASP.NET Core supports both RESTful APIs and gRPC, providing flexibility for different communication needs.
    • Microservices architecture: You’re building a microservices-based architecture. ASP.NET Core’s lightweight and modular design is well-suited for microservices.
    • High performance: Your application demands high performance and scalability. ASP.NET Core is designed to handle high traffic and large-scale applications efficiently.
    • Modern development practices: You prefer modern development practices such as dependency injection, asynchronous programming, and modular architecture. ASP.NET Core supports these practices out of the box.
    • Cross-platform requirements: You need to develop applications that run on Windows, macOS, Linux and Docker. ASP.NET Core’s cross-platform capabilities make it an excellent choice for diverse environments.
    • Cloud integration: You plan to deploy your applications to the cloud. ASP.NET Core integrates seamlessly with Azure and other cloud platforms, simplifying deployment and management.
    • Security and compliance: You require strong security features and compliance with industry standards. ASP.NET Core provides built-in support for HTTPS, data protection, and other security best practices.

    ibm websphere training courses malaysia

    When ASP.NET Core might not be a good fit

    ASP.NET Core might not be a good fit for your web development needs when your web app has any of these requirements:

    • Minimal requirements: Your application is a simple static page site.
    • Specific language preferences: Your team prefers working with languages other than C#. While ASP.NET Core supports multiple languages, it’s primarily designed for C# development.

    ibm lotus notes domino datastage training courses malaysia

  • How Blazor works

    Blazor provides many features to help you get started and deliver your next web app project fast. Let’s take a tour of the core capabilities of Blazor to help you decide whether you should use Blazor for your next great web app.

    ccna certification training courses malaysia

    Blazor components

    Blazor apps are built from components. A Blazor component is a reusable piece of web UI. A Blazor component encapsulates both its rendering and UI event handling logic. Blazor includes various built-in components for form handling, user input validation, displaying large data sets, authentication, and authorization. Developers can also build and share their own custom components, and many prebuilt Blazor components are available from the Blazor ecosystem.

    Use standard web technologies

    You author Blazor components using Razor syntax, a convenient mixture of HTML, CSS, and C#. A Razor file contains plain HTML and then C# to define any rendering logic, like for conditionals, control flow, and expression evaluation. Razor files are then compiled into C# classes that encapsulate the component’s rendering logic. Because Blazor components authored in Razor are just C# classes, you can call arbitrary .NET code from your components.

    careers

    UI event handling and data binding

    Interactive Blazor components can handle standard web UI interactions using C# event handlers. Components can update their state in response to UI events and adjust their rendering accordingly. Blazor also includes support for two-way data binding to UI elements as a way to keep component state in sync with UI elements.

    The following example is a simple Blazor counter component implemented in Razor. Most of the content is HTML, while the @code block contains C#. Every time the button is pressed the IncrementCount C# method is invoked, which increments the currentCount field, and then the component renders the updated value:

    razor

    <h1>Counter</h1>
    
    <p role="status">Current count: @currentCount</p>
    
    <button class="btn btn-primary" @onclick="IncrementCount">Click me</button>
    
    @code {
        private int currentCount = 0;
    
        private void IncrementCount()
        {
            currentCount++;
        }
    }
    

    Server and client-side rendering

    Blazor supports both server and client-side rendering of components to handle various web UI architectures. Components rendered from the server can access server resources, like databases and backend services. By default, Blazor components are rendered statically from the server, generating HTML in response to requests.

    You can also configure server components to be interactive, so they can handle arbitrary UI events, maintain state across interactions, and render updates dynamically. Interactive server components handle UI interactions and updates over a WebSocket connection with the browser.

    Diagram of Blazor interactive server rendering.

    Alternatively, Blazor components can be rendered interactively from the client. The component is downloaded to the client and run from the browser via WebAssembly. Interactive WebAssembly components can access client resources through the web platform, like local storage and hardware, and can even function offline once downloaded.

    Diagram of Blazor interactive WebAssembly rendering.

    You can choose to render different components from the server or the client within the same app. Many of the pages in your app might not require any interactivity at all, and can be rendered statically from the server. While other more interactive parts of your app can be handled from the server or client. You can decide which component render mode to use at design time or runtime. With Blazor, you have the flexibility to build the web app architecture that’s right for your scenario.

    Using Blazor to build a pizza shop

    The UI of the pizza shop app breaks down into many reusable components: a page layout with a navbar, individual pages, a pizza catalog and editor, an order component, and so on. Blazor provides built-in support for many of these components, like components for forms and validation. Many of the pages in the app can be handled from the server using static server-side rendering so that the site is mostly stateless and ready to scale. Where more interactivity is needed, the components are made interactive by applying an interactive render mode. To offload work from the server, interactive components are rendered on the client via WebAssembly. By building the entire app with a single web development stack, the app comes together quickly and soon the pizza orders are flowing in.

    rooms

  • Creating Manual Reservations

    Function and Origin of a Reservation

    Typically, you preplan goods issues (GIs) and transfer postings with a reservation, but you can also preplan goods receipts (GRs).

    Preplanning of transfer postings is only possible for transfer postings in the one-step procedure, from storage location-to-storage location (movement type 311) and plant-to-plant (movement type 301). The preplanning of GRs with a reservation should only take place in exceptional cases. If you are using purchasing and production, then GRs are planned with purchase orders (POs) and production orders. Receipt reservations are not necessary.

    Reservations can be created both manually and automatically.

    To the automatically generated reservations belong the following:

    • Dependent reservations:These reservations are for orders, networks, and work breakdown structure (WBS) elements.When you open an order, network, or project, the system automatically reserves the warehouse components.Although you can display dependent reservations, you cannot maintain them directly. For example, you cannot change a dependent reservation for an order directly, but need to change the components in the order. The system then automatically updates the reservation.
    • Stock transfer reservations:These reservations plan transfers between storage locations. If, for example, reorder point planning is managed at storage location level, and the available stock falls short of the reorder point, the system creates a stock transfer reservation in the plant with the amount of the replenishment quantity.

    quote

    Functions for Processing Manual Reservations

    The following functions are available in SAP S/4HANA for processing manual reservations.

    • SAP Fiori app Manage Manual Reservations
    • SAP Fiori app Manage Reservation Items
    • SAP GUI transactions MB21 (Create Reservation), MB22 (Change Reservation), and MB23 (Display Reservation) and the corresponding apps

    SAP Fiori App Manage Manual Reservations

    With this app, you can create a reservation manually with or without a template. You can also use this app to select manual reservations, display them in detail, and edit them if necessary. It is also possible to delete a manual reservation if none of the materials have been withdrawn. In the list of reservations, you can see, among other things, how many of the items of a reservation are completed. The app is part of the business role SAP_BR_WAREHOUSE_CLERK.

    To create a reservation using the app proceed as follows:

    1. On the app home page, choose the Create Reservation button at the top of the reservation list.
    2. In the pop-up window, enter a Movement TypePlant and Base Date and click Create button.
    3. In the General Information header, check the essential data and fill in the required fields, such as the account assignment object or the receiving storage location.
    4. In the Reservation Items tab page, enter data such as the material and the quantity. To create another item, click Create button at the top of the item list.
    5. Finally, choose Create.

    mobile app development

    SAP Fiori App Manage Reservation Items

    With this app, you can also create, change, and display reservations manually. You do this in the same way as in theManage Manual Reservations app.  You can also complete reservation items or mark items as deleted directly from the list. The app is part of the business role SAP_BR_WAREHOUSE_CLERK.

    Transactions MB21 / MB22 / MB23 to create, change, and display a manual reservation

    When you create a reservation, you can also refer to another reservation. You can then change the base date, movement type, and account assignment data. The system suggests the items from the reference reservation, and you can select the items you want to copy. You can also change the quantities and requirement dates of the items.

    Movement Allowed Indicator

    When posting a goods movement, you can refer only to reservation items for which the Movement Allowed indicator is selected. With this indicator, you can also prevent a goods movement from being posted to a reservation item. This is useful if the requirement date for the material is far in the future.

    In the MB21/MB22 transactions or the corresponding apps, you can select or deselect the indicator for all items of a reservation together. To do so, choose (Menu)EditAdditional FunctionsFor All ItemsMovement On/Off.

    With the Manage Reservations report, you can automatically have the system select the Movement allowed indicator even for items from several reservations.

    If you determine the reservation with the search function during the goods movement, the system selects only reservation items for which the Movement Allowed indicator is selected.

    Final Issue Indicator

    The Final Issue indicator is used to mark a reservation item as completed. It is set automatically during goods issue posting if the entire reserved quantity is withdrawn. You can also set the Final Issue indicator for a reservation item manually if you only issue a part of the reserved quantity and no longer require the remaining quantity. You can set the indicator directly when you enter the goods movement, but also by changing the reservation.

    You can edit the Final Issue indicator with the following functions:

    • Manage Reservation Items app
    • Manage Manual Reservations app
    • MB22 transaction or the corresponding app

    managed it services