Normalization is a term used by database professionals for a schema design process that minimizes data duplication and enforces data integrity.
While there are many complex rules that define the process of refactoring data into various levels (or forms) of normalization, a simple definition for practical purposes is:
Separate each entity into its own table.
Separate each discrete attribute into its own column.
Uniquely identify each entity instance (row) using a primary key.
In a relational database, you model collections of entities from the real world as tables. An entity can be anything for which you want to record information; typically important objects and events. For example, in a retail system example, you might create tables for customers, products, orders, and line items within an order. A table contains rows, and each row represents a single instance of an entity. In the retail scenario, each row in the customer table contains the data for a single customer, each row in the product table defines a single product, each row in the order table represents an order made by a customer, and each row in the line item table represents a product that was included in an order.
You’ve completed the migration of your workloads to the cloud. This pilot involved a small set of VMs comprising older applications, not considered business-critical. You’ve learned a lot about how the migration process works and are now better prepared to move larger numbers of more complex workloads to Azure.
Moving your workloads to the cloud doesn’t free you from all responsibility for the security of your operating system, applications, and data. Although the Azure platform provides a secure infrastructure, there’s a shared security responsibility model. You need to ensure your Azure environment is secure at the administrative, application, and network layers.
And while securing your environment is an ongoing activity, you should take certain actions right after migration to ensure your workloads are protected and secure.
In this unit, you’ll learn about techniques that you can use to secure your newly migrated VMs immediately after migration. You’ll continue to fine-tune the security controls on your workloads and applications over time, as you endeavor to protect your customers’ data and assets.
Migrating your on-premises workloads to Azure involves various phases. You’ve completed the planning and assessment, and prepared the environment and VMs for migration.
The next phase is to track and monitor the replication process, before running a full migration to Azure. You’ll run a test migration in a non-production environment to ensure that your VMs can successfully migrate to Azure before finally cutting over to a full migration.
In this unit, you’ll review the replication process and components involved. You’ll also learn how to track and monitor each phase of the migration process.
Replication process
The replication process consists of several steps, beginning with a Start Replication job.
On successful completion of the Start Replication job, the VMs start their initial replication to Azure.
During initial replication, a Hyper-V VM snapshot it taken. The Azure Site Recovery provider and Azure Recovery Service agent work together to replicate data from Hyper-V VMs to Azure. The replicated data is uploaded to a storage account in the Azure subscription.
Disk data from the snapshot is replicated to Hyper-V Replica managed disks in Azure. The replica disks are used to create the Azure VMs when you migrate.
Hyper-V Replica tracks disk changes during initial replication, and changes are stored in log files.
On completion of initial replication, the VM snapshot is deleted, and delta replication starts.
The Recovery Services agent periodically uploads replication logs to a log storage account.
You’ve completed discovery and assessment and have identified the specific servers you plan to migrate for the pilot. You’ve also ensured that required prerequisites are in place for the Azure Migrate project and your on-premises VMs.
Having completed these preparations, you’re ready to migrate your selected Hyper-V workloads to Azure.
In this unit, you’ll review Azure Migrate Server Migration and how to configure replication for specific workloads to Azure.
Set up replication
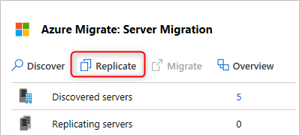
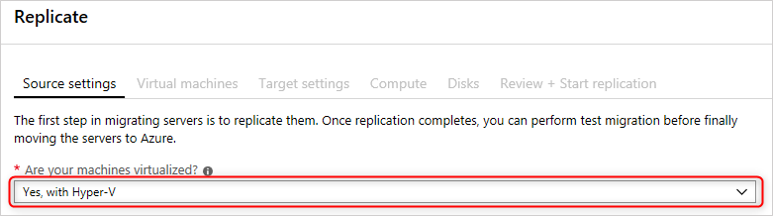
The first step in migrating servers is to replicate them. In this task, you configure and enable the replication of your on-premises virtual machines from Hyper-V to the Azure Migrate Server Migration service.
In the Azure Migrate Server Migration tool, click Replicate.
In Source settings, select the Hyper-V workload.
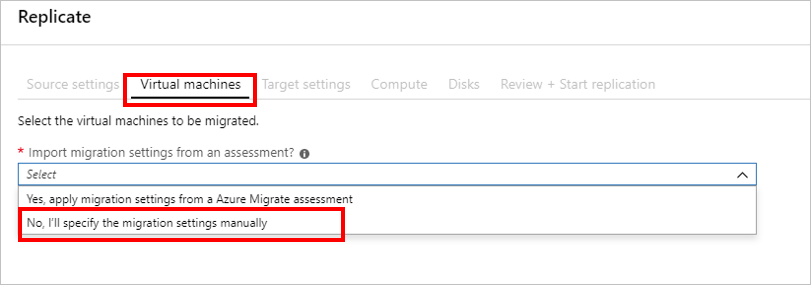
Although you can import migration settings from an existing assessment, you decide to specify the migrations settings for the VMs manually. This lets you change VM sizing and OS disk settings as needed.
In Virtual Machines, select the VMs you plan to migrate. You can replicate up to 10 machines together. You’ve selected 20 machines for the pilot, so you’ll replicate them in 2 batches of 10.
You’re ready to migrate your on-premises workloads to Azure. If you haven’t yet added the Azure Migrate Server Migration tool to the Azure Migrate project, you can do so now. The tool supports agentless migration of Windows and Linux VMs, which is appropriate as agentless migration is a requirement for your migration pilot.
Azure Migrate: Server Migration runs a lightweight Hyper-V VM appliance that discovers VMs and sends VM metadata and performance information to the tool. You’ve already set up the appliance during the discovery and assessment phase.
The Azure Migrate Server Migration service uses Azure Site Recovery as the underlying migration engine.
In this unit, you’ll look at how to deploy the Azure Site Recovery Provider on your Hyper-V host.
Hyper-V replication components
Before migrating your VMs, you’ll set up your Hyper-V host with the components it needs to manage replication of your VMs and data. With agentless migration, you install components on the Hyper-V host only. You don’t need to install anything on the Hyper-V VMs.
The Microsoft Azure Site Recovery provider orchestrates replication for Hyper-V VMs. The provider also installs the Microsoft Azure Recovery Service agent which handles data replication. Data is uploaded to a storage account that you created as part of preparing your on-premises workloads for migration.
After connecting to your Azure AI Vision resource endpoint, your client application can use the service to perform image analysis tasks.
Note the following requirements for image analysis:
The image must be presented in JPEG, PNG, GIF, or BMP format.
The file size of the image must be less than 4 megabytes (MB).
The dimensions of the image must be greater than 50 x 50 pixels.
Submitting an image for analysis
To analyze an image, you can use the Analyze Image REST method or the equivalent method in the SDK for your preferred programming language, specifying the visual features you want to include in the analysis.
C#Copy
using Azure.AI.Vision.ImageAnalysis;

ImageAnalysisClient client = new ImageAnalysisClient(
    "<YOUR_RESOURCE_ENDPOINT>",
    new AzureKeyCredential("<YOUR_AUTHORIZATION_KEY>"));

ImageAnalysisResult result = client.Analyze(
    <IMAGE_DATA_BYTES>, // Binary data from your image file
    VisualFeatures.Caption | VisualFeatures.Tags,
    new ImageAnalysisOptions { GenderNeutralCaption = true });
To use Azure AI Vision image analysis services, you need to provision an Azure AI Vision resource in your Azure subscription. You can choose from multiple provisioning options:
Create an Azure AI Foundryproject and an associated hub. By default, an Azure AI Foundry hub includes an Azure AI services multi-service resource, which includes Azure AI Vision. Azure AI Foundry projects are recommended for development of AI solutions on Azure that combine generative AI, agents, and pre-built Azure AI services, or which involve collaborative development by a team of software engineers and service operators.
If you don’t need all of the functionality in an Azure AI Foundry hub, you can create an Azure AI services multi-service resource in your Azure subscription. You can then use this resource to access Azure AI Vision services and other AI services through a single endpoint and key.
If you only need to use Azure AI Vision functionality, or you’re just experimenting with the service, you can create a standalone Computer Vision resource in your Azure subscription. One benefit of this approach is that the standalone service provides a free tier that you can use to explore the service at no cost.
Organizations face increasing complexity and change in regulatory environments, calling for a more structured approach for managing governance, risk, and compliance (GRC).
As organizations establish GRC competency they can establish a framework that includes implementing specific policies, operational processes, and technologies. A structured approach for managing GRC helps organizations reduce risk and improve compliance effectiveness.
An important prerequisite to establishing GRC competency is understanding the key terms.
Governance
Governance is the system of rules, practices, and processes an organization uses to direct and control its activities. Many governance activities arise from external standards, obligations, and expectations. For example, organizations establish rules and process that define the who, what, where, and when users and applications can access corporate resources and who has administrative privileges and for how long.
One way to mitigate against common cybersecurity threats is to encrypt sensitive or valuable data. Encryption is the process of making data unreadable and unusable to unauthorized viewers. To use or read encrypted data, it must be decrypted, which requires the use of a secret key.
There are two top-level types of encryption: symmetric and asymmetric. Symmetric encryption uses the same key to encrypt and decrypt the data. Asymmetric encryption uses a public key and private key pair. Either key can encrypt data, but the key used to encrypt can’t be used to decrypt encrypted data. To decrypt, you need a paired key. For example, if the public key is used to encrypt, then only the corresponding private key can be used to decrypt. Asymmetric encryption is used for things such accessing sites on the internet using the HTTPS protocol and electronic data signing solutions. Encryption may protect data at rest, or in transit.