Category: Uncategorized

  • Securing the Azure AI Agent Service

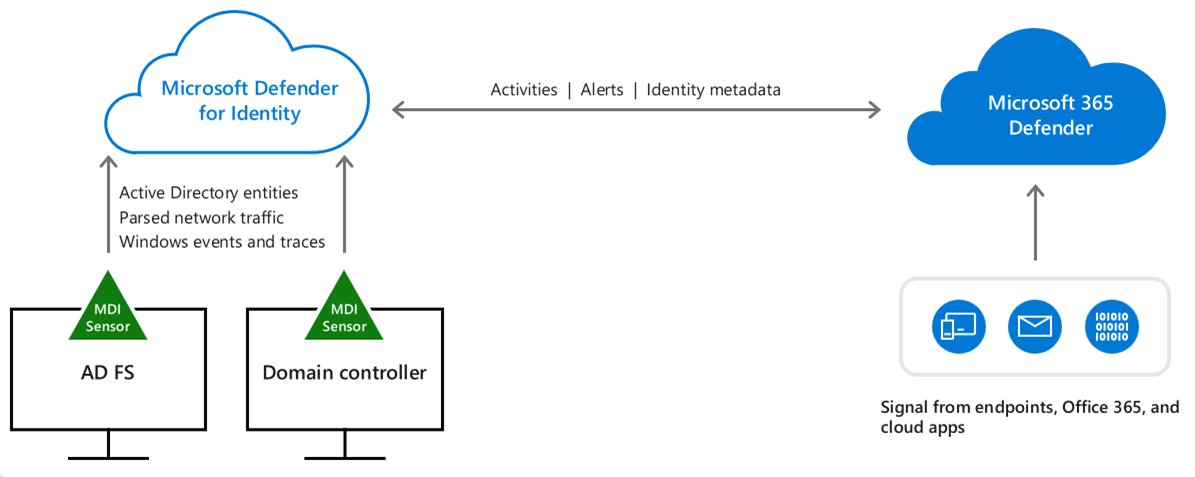
    In Azure AI Foundry, Agents are associated with projects and projects are located within hubs. Hubs are the primary top-level Azure resource for Azure AI Foundry and provide a central way for a team to govern security, connectivity, and computing resources across playgrounds and projects. Typically, an IT Admin or technical lead manages a hub. These IT Admins or technical leads can use hubs to govern infrastructure, including virtual network setup, customer-managed keys, managed identities, and policies, and configure relevant Azure AI services. Once a hub is created, developers can create projects from it and access shared company resources without needing an IT administrator’s repeated help.

    Projects function as isolated development spaces, allowing developers and data scientists to build, test, and deploy AI systems. Each time a new project gets created within a hub, it automatically inherits that hub’s security settings. Agents, being part of projects, can leverage the resources and configurations set at both the hub and project levels.

    You can apply security controls through the Azure AI Foundry interface or by applying security controls through the Azure portal. When you deploy a hub and project, these resources are stored within a resource group in your Azure subscription. The Azure AI Foundry provides an abstracted way of interacting with these security controls without requiring an understanding of Azure administration principles. Azure AI Foundry allows you to configure role based access control roles. Within the Azure portal, you can configure the following security settings at the Azure AI Hub level:

    • Role based access control
    • Network access
    • Monitoring alerts, metrics and logs

    At the Azure AI project level, you can configure role based access control, monitoring alerts, metrics, and logs, but can’t configure network access restrictions. In the majority of scenarios, you configure security controls related to Azure AI Agents Service agents at the hub level. When you need to have different sets of security controls, you host Azure AI Agent Service agents in different Azure AI hubs.

    dynamics 365 training courses malaysia

  • Understand the Azure AI Agent Service

    Azure AI Agent Service is a fully managed service designed to empower developers to securely build, deploy, and scale high-quality, and extensible AI agents without needing to manage the underlying compute and storage resources. Tasks that can take hundreds of lines of code to support client side function calling can now be achieved with just a few lines of code with Azure AI Agent Service.

    An AI Agent acts as a “smart” microservice that can be used to answer questions (Retrieval Augmented Generation), perform actions, or completely automate workflows. AI agents achieve this by combining the power of generative AI models to understand information resources with tools that allow that model to access and interact with real-world data sources.

    Because Azure AI Agent Service is a service fully managed by Microsoft, you can focus on building workflows and the agents that power them without needing to worry about scaling, security, or management of the underlying infrastructure for individual agents.

    As Azure AI Agent Service is a service managed by Microsoft and you don’t need to worry about the underlying security of its moving parts, you should still apply standard security principles when you use the AI agent service. These principles include:

    • Restrict access to the service using role based access control. Ensure that only appropriate security principals can interact with the AI agent service and institute the principle of least privilege.
    • Restrict the access of the AI Agent service. The AI Agent service is interacting with sensitive resources, such as organizational data. Ensure that the scope of this access is limited and that the AI Agent service and its tools only have necessary visibility of resources such as data stores.
    • Restrict network access to the AI Agent service and the network access of the AI agent service. Limit which network hosts can interact with the AI Agent service and control which network hosts the AI Agent service and it’s associated tools are able to reach.

    dynamics 365 supply chain training courses malaysia

  • Explore Microsoft Defender for Identity

    Microsoft Defender for Identity (formerly Azure Advanced Threat Protection, also known as Azure ATP) is a cloud-based security solution. Defender for identity uses your on-premises Active Directory signals to identify, detect, and investigate advanced threats, compromised identities, and malicious insider actions directed at your organization. Defender for Identity enables SecOp analysts and security professionals struggling to detect advanced attacks in hybrid environments to:

    • Monitor users, entity behavior, and activities with learning-based analytics
    • Protect user identities and credentials stored in Active Directory
    • Identify and investigate suspicious user activities and advanced attacks throughout the kill chain
    • Provide clear incident information on a simple timeline for fast triage

    Process flow for Defender for Identity

    Diagram of the data flow for protecting identities using Microsoft Defender for Identity.

    Defender for Identity consists of the following components:

    • Defender for Identity portal – The Defender for Identity portal allows the creation of your Defender for Identity instance, displays the data received from Defender for Identity sensors, and enables you to monitor, manage, and investigate threats in your network environment.
    • Defender for Identity sensor – Defender for Identity sensors can be directly installed on the following servers:
      • Domain controllers: The sensor directly monitors domain controller traffic, without the need for a dedicated server, or configuration of port mirroring.
      • Active Directory Federated Services (AD FS): The sensor directly monitors network traffic and authentication events.
    • Defender for Identity cloud service – Defender for Identity cloud service runs on Azure infrastructure and is currently deployed in the US, Europe, and Asia. Defender for Identity cloud service is connected to Microsoft’s intelligent security graph.

    dynamics 365 sales training courses malaysia

  • Implement security for workload identities

    Microsoft Entra Identity Protection has historically protected users in detecting, investigating, and remediating identity-based risks. Identity protection has extended these capabilities to workload identities to protect applications, service principals, and Managed Identities.

    A workload identity is an identity that allows an application or service principal access to resources, sometimes in the context of a user. These workload identities differ from traditional user accounts as they:

    • Can’t perform multifactor authentication.
    • Often have no formal lifecycle process.
    • Need to store their credentials or secrets somewhere.

    These differences make workload identities harder to manage and put them at higher risk for compromise.

    Requirements to use workload identity protection

    To make use of workload identity risk, including the new Risky workload identities (preview) blade and the Workload identity detections tab in the Risk detections blade, in the Azure portal you must have the following.

    • Microsoft Entra ID Premium P2 licensing
    • Logged in user must be assigned either:
      • Security administrator
      • Security operator
      • Security reader

    dynamics 365 finance training courses malaysia

  • Monitor, investigate, and remediate elevated risky users

    Investigate risk

    Identity Protection provides organizations with three reports they can use to investigate identity risks in their environment: risky usersrisky sign-ins, and risk detections. Investigating events is key to better understanding and identifying any weak points in your security strategy.

    All three reports allow for downloading of events in .CSV format for further analysis outside of the Azure portal. The risky users and risky sign-ins reports allow for downloading the most recent 2,500 entries, while the risk detections report allows for downloading the most recent 5,000 records.

    Organizations can take advantage of the Microsoft Graph API integrations to aggregate data with other sources they have access to as an organization.

    You can find the three reports in the Microsoft Entra admin center, then Identity, and then Protection – Identity Protection.

    Each report launches with a list of all detections for the period shown at the top of the report. Each report allows for the addition or removal of columns based on administrator preference. Administrators can choose to download the data in .CSV or .JSON format. Reports can be filtered using the filters across the top of the report.

    Selecting individual entries enables additional entries at the top of the report, such as the ability to confirm a sign-in as compromised or safe, confirm a user as compromised, or dismiss user risk.

    Selecting individual entries expands a details window below the detections. The details view allows administrators to investigate and perform actions on each detection.

    Screenshot of the Identity Protection report showing risky sign-ins and details.

    Risky users

    With the information provided by the risky users report, administrators can find:

    • Which users are at risk, have had risk remediated, or have had risk dismissed?
    • Details about detections.
    • History of all risky sign-ins.
    • Risk history.

    Administrators can then choose to take action on these events. They can choose to:

    • Reset the user password.
    • Confirm user compromise.
    • Dismiss user risk.
    • Block user from signing in.
    • Investigate further using Azure ATP.

    Risky sign-ins

    The risky sign-ins report contains filterable data for up to the past 30 days (one month).

    With the information provided by the risky sign-ins report, administrators can find:

    • Which sign-ins are classified as at risk, confirmed compromised, confirmed safe, dismissed, or remediated.
    • Real-time and aggregate risk levels associated with sign-in attempts.
    • Detection types triggered.
    • Conditional Access policies applied.
    • MFA details.
    • Device information.
    • Application information.
    • Location information.

    Administrators can then choose to take action on these events. Administrators can choose to:

    • Confirm sign-in compromise.
    • Confirm sign-in safe.

    Risk detections

    The risk detections report contains filterable data for up to the past 90 days (three months).

    With the information provided by the risk detections report, administrators can find:

    • Information about each risk detection including type.
    • Other risks triggered at the same time.
    • Sign-in attempt location.

    Administrators can then choose to return to the user’s risk or sign-ins report to take actions based on information gathered.

    The risk detection report also provides a clickable link to the detection in the Microsoft Defender for Cloud Apps (MDCA) portal where you can view additional logs and alerts.

    dynamics 365 field service training courses malaysia

  • Exercise enable sign-in risk policy

    Enable user risk policy

    1. Sign in to the Microsoft Entra admin center using a Global administrator account.
    2. Open the portal menu and then select Identity.
    3. On the Identity menu, select Protection.
    4. On the Security blade, in the left navigation, select Identity protection.
    5. In the Identity protection blade, in the left navigation, select User risk policy.Screenshot of the User risk policy page and highlighted browsing path.
    6. Under Assignments, select All users and review the available options. You can select from All users or Select individuals and groups if limiting your rollout. Additionally, you can choose to exclude users from the policy.
    7. Under User risk, select Low and above.
    8. In the User risk pane, select High and then select Done.
    9. Under Controls, then Access, and then select Block access.
    10. In the Access pane, review the available options.

     Tip

    Microsoft’s recommendation is to Allow access and Require password change.

    1. Select the Require password change check box and then select Done.
    2. Under Enforce Policy, select On and then select Save.

    Enable sign-in risk policy

    1. On the Identity protection blade, in the left navigation, select Sign-in risk policy.
    2. As with the User risk policy, the Sign-in risk policy can be assigned to users and groups and allows you to exclude users from the policy.
    3. Under Sign-in risk, select Medium and above.
    4. In the Sign-in risk pane, select High and then select Done.
    5. Under Controls, then Access, and then select Block access.
    6. Select the Require multifactor authentication check box and then select Done.
    7. Under Enforce Policy, select On and then select Save.

    dynamics 365 customer service training courses malaysia

  • Implement and manage user risk policy

    There are two risk policies that can be enabled in the directory:

    • Sign-in risk policy: The sign-in risk policy detects suspicious actions that come along with the sign-in. It’s focused on the sign-in activity itself and analyzes the probability that the sign-in was performed by some other than the user.Screenshot of the Security overview page to enable user and sign-in risk policies.
    • User risk policy: The user risk policy detects the probability that a user account has been compromised by detecting risk events that are atypical of a user’s behavior.

    Both policies work to automate the response to risk detections in your environment and allow users to self-remediate when risk is detected.

    devops certification training courses malaysia

  • Review identity protection basics

    Identity Protection is a service that enables organizations to view the security posture of any account. Organizations can accomplish three key tasks:

    • Automate the detection and remediation of identity-based risks.
    • Investigate risks using data in the portal.
    • Export risk detection data to third-party utilities for further analysis.

    Always remember that Microsoft Entra Identity Protection requires a Microsoft Entra ID Premium P2 license to operate. Licensing is covered in more detail in a later unit.

    Identity Protection uses the knowledge Microsoft has gained from its position in organizations with Microsoft Entra ID, the consumer space with Microsoft Accounts, and in gaming with Xbox to protect your users. Microsoft analyzes 6.5 trillion signals per day to identify and protect customers from threats.

    The signals generated by and fed to Identity Protection can be further fed into tools like Conditional Access to make access decisions or fed back to a security information and event management (SIEM) tool for further investigation based on your organization’s enforced policies.

    dell emc training courses malaysia

  • Explore variants and monitoring options

    During production, you want to optimize and deploy your flow. Finally, you want to monitor your flows to understand when improving your flows is necessary.

    You can optimize your flow by using variants, you can deploy your flow to an endpoint, and you can monitor your flow by evaluating key metrics.

    Explore variants

    Prompt flow variants are versions of a tool node with distinct settings. Currently, variants are only supported in the LLM tool, where a variant can represent a different prompt content or connection setting. Variants allow users to customize their approach for specific tasks, like, summarizing news articles.

    Some benefits of using variants are:

    • Enhance the quality of your LLM generation: Creating diverse variants of an LLM node helps find the best prompt and settings for high-quality content.
    • Save time and effort: Variants allow for easy management and comparison of different prompt versions, streamlining historical tracking and reducing the effort in prompt tuning.
    • Boost productivity: They simplify the optimization of LLM nodes, enabling quicker creation and management of variations, leading to better results in less time.
    • Facilitate easy comparison: Variants enable side-by-side result comparisons, aiding in choosing the most effective variant based on data-driven decisions.

    Deploy your flow to an endpoint

    When you’re satisfied with the performance of your flow, you can choose to deploy it to an online endpoint. Endpoints are URLs that you can call from any application. When you make an API call to an online endpoint, you can expect (almost) immediate response.

    When you deploy your flow to an online endpoint, prompt flow generates a URL and key so you can safely integrate your flow with other applications or business processes. When you invoke the endpoint, a flow is run and the output is returned in real-time. As a result, deploying flows to endpoints can for example generate chat or agentic responses that you want to return in another application.

    Monitor evaluation metrics

    In prompt flow, monitoring evaluation metrics is key to understanding your LLM application’s performance, ensuring they meet real-world expectations and deliver accurate results.

    To understand whether your application is meeting practical needs, you can collect end-user feedback and assess the application’s usefulness. Another approach to understanding whether your application is performing well, is by comparing LLM predictions with expected or ground truth responses to gauge accuracy and relevance. Evaluating the LLM’s predictions is crucial for keeping LLM applications reliable and effective.

    Metrics

    The key metrics used for monitoring evaluation in prompt flow each offer unique insight into the performance of LLMs:

    • Groundedness: Measures alignment of the LLM application’s output with the input source or database.
    • Relevance: Assesses how pertinent the LLM application’s output is to the given input.
    • Coherence: Evaluates the logical flow and readability of the LLM application’s text.
    • Fluency: Assesses the grammatical and linguistic accuracy of the LLM application’s output.
    • Similarity: Quantifies the contextual and semantic match between the LLM application’s output and the ground truth.

    Metrics like groundednessrelevancecoherencefluency, and similarity are key for quality assurance, ensuring that interactions with your LLM applications are accurate and effective. Whenever your LLM application doesn’t perform as expected, you need to revert back to experimentation to iteratively explore how to improve your flow.

    hadoop training courses malaysia

  • Explore connections and runtimes

    When you create a Large Language Model (LLM) application with prompt flow, you first need to configure any necessary connections and runtimes.

    Explore connections

    Whenever you want your flow to connect to external data source, service, or API, you need your flow to be authorized to communicate with that external service. When you create a connection, you configure a secure link between prompt flow and external services, ensuring seamless and safe data communication.

    Diagram showing a flow with two nodes, connecting to Azure AI Search and Azure OpenAI.

    Depending on the type of connection you create, the connection securely stores the endpoint, API key, or credentials necessary for prompt flow to communicate with the external service. Any necessary secrets aren’t exposed to users, but instead are stored in an Azure Key Vault.

    By setting up connections, users can easily reuse external services necessary for tools in their flows.

    citrix training courses malaysia