Author: ultroni1

  • Implement RAG in a prompt flow

    After uploading data to Azure AI Foundry and creating an index on your data using the integration with Azure AI Search, you can implement the RAG pattern with Prompt Flow to build a generative AI application.

    Prompt Flow is a development framework for defining flows that orchestrate interactions with an LLM.

    Diagram of a prompt flow.

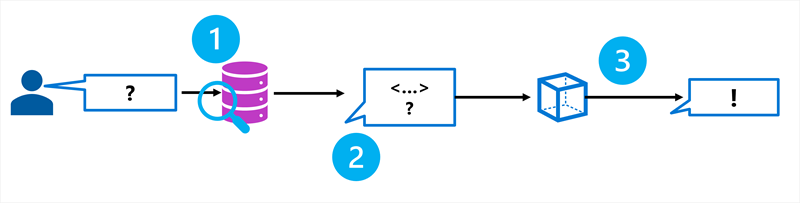
    A flow begins with one or more inputs, usually a question or prompt entered by a user, and in the case of iterative conversations the chat history to this point.

    The flow is then defined as a series of connected tools, each of which performs a specific operation on the inputs and other environmental variables. There are multiple types of tool that you can include in a prompt flow to perform tasks such as:

    • Running custom Python code
    • Looking up data values in an index
    • Creating prompt variants – enabling you to define multiple versions of a prompt for a large language model (LLM), varying system messages or prompt wording, and compare and evaluate the results from each variant.
    • Submitting a prompt to an LLM to generate results.

    Finally, the flow has one or more outputs, typically to return the generated results from an LLM.

    red hat certified specialist in linux performance tuning malaysia

  • Create a RAG-based client application

    When you’ve created an Azure AI Search index for your contextual data, you can use it with an OpenAI model. To ground prompts with data from your index, the Azure OpenAI SDK supports extending the request with connection details for the index.

    The following Python code example shows how to implement this pattern.

    PythonCopy

    from openai import AzureOpenAI
    
    # Get an Azure OpenAI chat client
    chat_client = AzureOpenAI(
        api_version = "2024-12-01-preview",
        azure_endpoint = open_ai_endpoint,
        api_key = open_ai_key
    )
    
    # Initialize prompt with system message
    prompt = [
        {"role": "system", "content": "You are a helpful AI assistant."}
    ]
    
    # Add a user input message to the prompt
    input_text = input("Enter a question: ")
    prompt.append({"role": "user", "content": input_text})
    
    # Additional parameters to apply RAG pattern using the AI Search index
    rag_params = {
        "data_sources": [
            {
                "type": "azure_search",
                "parameters": {
                    "endpoint": search_url,
                    "index_name": "index_name",
                    "authentication": {
                        "type": "api_key",
                        "key": search_key,
                    }
                }
            }
        ],
    }
    
    # Submit the prompt with the index information
    response = chat_client.chat.completions.create(
        model="<model_deployment_name>",
        messages=prompt,
        extra_body=rag_params
    )
    
    # Print the contextualized response
    completion = response.choices[0].message.content
    print(completion)
    

    In this example, the search against the index is keyword-based – in other words, the query consists of the text in the user prompt, which is matched to text in the indexed documents. When using an index that supports it, an alternative approach is to use a vector-based query in which the index and the query use numeric vectors to represent text tokens. Searching with vectors enables matching based on semantic similarity as well as literal text matches.

    To use a vector-based query, you can modify the specification of the Azure AI Search data source details to include an embedding model; which is then used to vectorize the query text.

    PythonCopy

    rag_params = {
        "data_sources": [
            {
                "type": "azure_search",
                "parameters": {
                    "endpoint": search_url,
                    "index_name": "index_name",
                    "authentication": {
                        "type": "api_key",
                        "key": search_key,
                    },
                    # Params for vector-based query
                    "query_type": "vector",
                    "embedding_dependency": {
                        "type": "deployment_name",
                        "deployment_name": "<embedding_model_deployment_name>",
                    },
                }
            }
        ],
    }

    red hat certified specialist in server hardening malaysia

  • Make your data searchable

    When you want to create an agent that uses your own data to generate accurate answers, you need to be able to search your data efficiently. When you build an agent with the Azure AI Foundry, you can use the integration with Azure AI Search to retrieve the relevant context in your chat flow.

    Azure AI Search is a retriever that you can include when building a language model application with prompt flow. Azure AI Search allows you to bring your own data, index your data, and query the index to retrieve any information you need.

    Diagram showing an index being queried to retrieve grounding data.

    Using a vector index

    While a text-based index will improve search efficiency, you can usually achieve a better data retrieval solution by using a vector-based index that contains embeddings that represent the text tokens in your data source.

    An embedding is a special format of data representation that a search engine can use to easily find the relevant information. More specifically, an embedding is a vector of floating-point numbers.

    For example, imagine you have two documents with the following contents:

    • “The children played joyfully in the park.”
    • “Kids happily ran around the playground.”

    These two documents contain texts that are semantically related, even though different words are used. By creating vector embeddings for the text in the documents, the relation between the words in the text can be mathematically calculated.

    red hat enterprise linux rhel training courses malaysia

  • Understand how to ground your language model

    Language models excel in generating engaging text, and are ideal as the base for agents. Agents provide users with an intuitive chat-based application to receive assistance in their work. When designing an agent for a specific use case, you want to ensure your language model is grounded and uses factual information that is relevant to what the user needs.

    Though language models are trained on a vast amount of data, they may not have access to the knowledge you want to make available to your users. To ensure that an agent is grounded on specific data to provide accurate and domain-specific responses, you can use Retrieval Augmented Generation (RAG).

    Understanding RAG

    RAG is a technique that you can use to ground a language model. In other words, it’s a process for retrieving information that is relevant to the user’s initial prompt. In general terms, the RAG pattern incorporates the following steps:

    Diagram of the retrieval augmented generation pattern.
    1. Retrieve grounding data based on the initial user-entered prompt.
    2. Augment the prompt with grounding data.
    3. Use a language model to generate a grounded response.

    By retrieving context from a specified data source, you ensure that the language model uses relevant information when responding, instead of relying on its training data.

    Using RAG is a powerful and easy-to-use technique for many cases in which you want to ground your language model and improve the factual accuracy of your generative AI app’s responses.

    red hat linux administration training courses malaysia

  • Set up, configure, and troubleshoot GitHub Copilot

    This unit explains how to sign up for GitHub Copilot, how to configure GitHub Copilot by using VS Code, and how to troubleshoot GitHub Copilot by using VS Code.

    Sign up for GitHub Copilot

    Before you can start using GitHub Copilot, you need to set up a free trial or subscription for your account.

    To get started, select your GitHub profile photo, and then select Settings. Copilot is on the left menu under Code, planning, and automation.

    After you sign up, you need to install an extension for your preferred environment. GitHub Copilot supports GitHub.com (which doesn’t need an extension), VS Code, Visual Studio, JetBrains IDEs, and Neovim as an unobtrusive extension.

    For this module, you’ll just review extensions and configurations for VS Code. The exercise that you’ll complete in the next unit uses VS Code.

    If you’re using a different environment, you can find specific links to set up other environments in the “References” section at the end of this module.

    red hat linux certification malaysia

  • Interact with Copilot

    This unit explores ways that you can maximize your interaction with GitHub Copilot in your development environment. By understanding the service’s features and capabilities, you learn how to use it effectively.

    The following sections describe the various ways to trigger and use GitHub Copilot, along with examples and shortcuts to help you get the most out of it.

    Inline suggestions

    Inline suggestions are the most immediate form of assistance in Copilot. As you type, Copilot analyzes your code and context to offer real-time code completions. This feature predicts what you might want to write next and displays suggestions in a subtle, unobtrusive way.

    The suggestions that Copilot offers appear as grayed-out text ahead of your cursor.

    • To accept a suggestion, select the Tab key or the > (right arrow) key.
    • To reject a suggestion, keep typing or select the Esc key.

    Inline suggestions are especially useful when you’re working on repetitive tasks or you need quick boilerplate code.

    Here’s an example:

    PythonCopy

    def calculate_average(numbers):
        # Start typing here and watch Copilot suggest the function body

    sap erp procurement material management training courses malaysia

  • GitHub Copilot, your AI pair programmer

    It’s no secret that AI is disrupting the technology industry. AI is shaping how development teams work and build software. These advancements in AI can enhance the productivity of developers around the world.

    The addition of AI features to the developer tools that you use and love helps you collaborate, develop, test, and ship your products faster and more efficiently than ever before. GitHub Copilot is a service that provides you with an AI pair programmer that works with all of the popular programming languages.

    In recent research, GitHub and Microsoft found that developers experience a significant productivity boost when they use GitHub Copilot to work on real-world projects and tasks. In fact, in the three years since its launch, developers have experienced the following benefits while using GitHub Copilot:

    • 46% of new code now written by AI
    • 55% faster overall developer productivity
    • 74% of developers feeling more focused on satisfying work

    Microsoft developed GitHub Copilot in collaboration with OpenAI. GitHub Copilot is powered by the OpenAI Codex system. OpenAI Codex has broad knowledge of how people use code and is more capable than GPT-3 in code generation. OpenAI Codex is more capable, in part, because it was trained on a dataset that included a larger concentration of public source code.

    GitHub Copilot is available as an extension for VS Code, Visual Studio, Vim/Neovim, and the JetBrains suite of IDEs.

    sap erp pp production planning training courses malaysia

  • Create a chat client

    A common scenario in an AI application is to connect to a generative AI model and use prompts to engage in a chat-based dialog with it.

    While you can use the Azure OpenAI SDK, to connect “directly” to a model using key-based or Microsoft Entra ID authentication; when your model is deployed in an Azure AI Foundry project, you can also use the Azure AI Foundry SDK to retrieve a project client, from which you can then get an authenticated OpenAI chat client for any models deployed in the project’s Azure AI Foundry resource. This approach makes it easy to write code that consumes models deployed in your project, switching between them easily by changing the model deployment name parameter.

    sap fico financial accounting training courses malaysia

  • Work with project connections

    Each Azure AI Foundry project includes connected resources, which are defined both at the parent (Azure AI Foundry resource or hub) level, and at the project level. Each resource is a connection to an external service, such as Azure storage, Azure AI Search, Azure OpenAI, or another Azure AI Foundry resource.

    Screenshot of the connected resources page in Azure AI Foundry portal.

    With the Azure AI Foundry SDK, you can connect to a project and retrieve connections; which you can then use to consume the connected services.

    For example, the AIProjectClient object in Python has a connections property, which you can use to access the resource connections in the project. Methods of the connections object include:

    • connections.list(): Returns a collection of connection objects, each representing a connection in the project. You can filter the results by specifying an optional connection_type parameter with a valid enumeration, such as ConnectionType.AZURE_OPEN_AI.
    • connections.get(connection_name, include_credentials): Returns a connection object for the connection with the name specified. If the include_credentials parameter is True (the default value), the credentials required to connect to the connection are returned – for example, in the form of an API key for an Azure AI services resource.

    The connection objects returned by these methods include connection-specific properties, including credentials, which you can use to connect to the associated resource.

    The following code example lists all of the resource connections that have been added to a project:

    PythonCopy

    from azure.identity import DefaultAzureCredential
    from azure.ai.projects import AIProjectClient
    
    try:
    
        # Get project client
        project_endpoint = "https://....."
        project_client = AIProjectClient(            
                credential=DefaultAzureCredential(),
                endpoint=project_endpoint,
            )
        
        ## List all connections in the project
        connections = project_client.connections
        print("List all connections:")
        for connection in connections.list():
            print(f"{connection.name} ({connection.type})")
    
    except Exception as ex:
        print(ex)

    sap s 4 hana training courses malaysia

  • What is the Azure AI Foundry SDK?

    Azure AI Foundry provides a REST API that you can use to work with AI Foundry projects and the resources they contain. Additionally, multiple language-specific SDKs are available, enabling developers to write code that uses resources in an Azure AI Foundry project in their preferred development language. With an Azure AI Foundry SDK, developers can create applications that connect to a project, access the resource connections and models in that project, and use them to perform AI operations, such as sending prompts to a generative AI model and processing the responses.

    The core package for working with projects is the Azure AI Projects library, which enables you to connect to an Azure AI Foundry project and access the resources defined within it. Available language-specific packages the for Azure AI Projects library include:

    sap supply chain management scm training courses malaysia